Strategies for CI/CD at scale

Part 2 of 3 in Sudoblark Best Practices
Introduction
A few years ago I was deep into building out the DevOps capability for a client. Not maintaining what was already there, but building it from scratch: establishing patterns, designing pipelines, figuring out governance — automation everywhere, CI/CD embedded in every repository, security scanning baked into the process rather than bolted on at the end.
The problem was that appetite for CI/CD was running well ahead of what the platform could support. As the estate grew — pipelines accumulating across repositories, teams, and environments — the underlying structure started to buckle. Nobody had planned for it. The pipelines had just accumulated, organically, over time.
Something had to give. I could either accept the ceiling the platform was imposing or figure out an architecture that would scale with the ambition. I chose the latter.
This post is the result: naming conventions to restore traceability, a centralised component library to stop reinventing the same pipelines, CLI tooling to fill gaps the platform wouldn’t plug, and versioned documentation so teams could discover what I’d built. It’s the same material I’ve presented at a few talks, and I’ve seen it work at organisations running over a thousand pipelines and eight thousand builds a month.
Prerequisites
- Familiarity with at least one CI/CD platform (GitHub Actions, Azure DevOps, GitLab CI)
- A rough sense of what a pipeline, build, and deployment look like in practice
A quick primer on CI/CD
Before going further, some term definitions to establish shared vocabulary.
| Term | Description |
|---|---|
| Pipeline | A static artefact containing an arbitrary collection of tasks which, when performed, achieve a business goal. Usually generalised with well-defined inputs and outputs to allow for different runtime behaviour. |
| Build | A singular execution of a pipeline, with discrete input values provided and outputs produced. |
| Continuous Integration (CI) | The practice of automating the integration of code from various sources into a singular whole — typically running tests on every commit or pull request. |
| Continuous Deployment (CD) | The practice of automatically releasing a release candidate into production after passing automated tests. |
| Continuous Delivery (CD) | Having an automated release pipeline but triggering it manually, or placing deployment behind an approval gate. |
The problem with organic CI/CD at scale
CI/CD platforms tend to grow organically. Developers self-serve their needs, specialist teams hand-craft pipelines when things get complicated, and the whole thing muddles along well enough — until it doesn’t.
This is the Big Ball of Mud pattern applied to CI/CD infrastructure. It emerges from two conditions that are, individually, perfectly reasonable: developers provisioning CI/CD to serve their immediate needs without any prior architecture to direct those decisions, and DevOps or cloud teams hand-crafting pipelines on request to plug gaps as they appear.
At small scale, both of these are fine. A lean startup with five developers doesn’t need a CI/CD architecture — it needs working pipelines.
The trouble starts when the organisation scales. With hundreds of repositories, multiple teams, and plans for automated deployments across several environments, a CI/CD estate that grew without structure buckles in predictable ways:
- Loss of traceability. Nobody can tell — at a glance — what a given pipeline does, who owns it, or what environment it deploys to. That knowledge lives in people’s heads, and it leaves with them.
- Loss of flexibility. Rolling out a security fix or tool-version update across every pipeline means doing it repository by repository. There’s no central point of control.
- Squandered specialists. DevOps engineers end up hand-crafting pipelines rather than building platform capabilities. That’s a finite resource deployed at the wrong level of abstraction.
I’ve seen all three slow down real engagements significantly. The rest of this post is about addressing them.
Start with naming
The first — and frankly least exciting — thing that makes a genuine difference at scale is a naming convention for pipelines.
I know. But naming is the cheapest forcing function available. Getting it right means answering the most basic governance questions — what is this pipeline, what does it deploy, where — without digging through code or relying on whoever was around when it was created.
The structure I’ve settled on organises pipelines hierarchically:
- Project — the top-level organisational unit. Separation of concerns by logical business domain, which matters for both permissions and cognitive load.
- Repository — the specific repository the pipeline relates to. If your repositories have clear domains of responsibility, this gives you immediate visibility of what a pipeline interacts with.
- Type — whether this is a CI or CD pipeline. Communicates what the pipeline does at a high level without requiring any further investigation.
- Environment (for deployments) — explicitly named. Not “dev”. Not “test”. The actual environment identifier.

Naming environments explicitly — after the account name, the data centre, whatever the real identifier is — sounds like pedantry until you’ve spent half a day tracking down where “dev” deploys when the organisation has fifty AWS accounts that could all reasonably claim that label.
I’ve used this as a quick heuristic: if you can’t sit a new hire down, show them your pipeline structure, and have them understand where things are deploying without any further explanation — you’re doing it wrong.
If you’re running mono-repos, the hierarchy adapts slightly. A repository responsible for both app A and app B splits at the repository level: project/repo/app-a/ci and project/repo/app-b/ci. The structure still holds; you just go one level deeper.
A note on GitHub Actions
Most CI/CD platforms support hierarchical pipeline organisation out of the box. Azure DevOps has folder structures. GitLab CI organises by repository. CircleCI organises by project.
GitHub Actions is the exception. As of early 2025, all workflow files must live in .github/workflows/ with a completely flat file structure — no folder organisation. This has been an open community issue since 2022 and remains unresolved.
The workaround is to embed the hierarchy in the filename itself: deployment.project.repository.environment.yaml. It’s clunky, but it works — the pipeline list in the GitHub UI reflects the naming convention and you get the same traceability even without folder support.
The distribution decision
Once naming is sorted, the next question is how to structure the actual pipeline code so it scales. Copy-paste doesn’t work. Every time you duplicate a pipeline and modify it slightly, you’ve forked the implementation — and any future improvement (a security fix, a faster tool, a new standard) needs to be propagated to every fork manually.
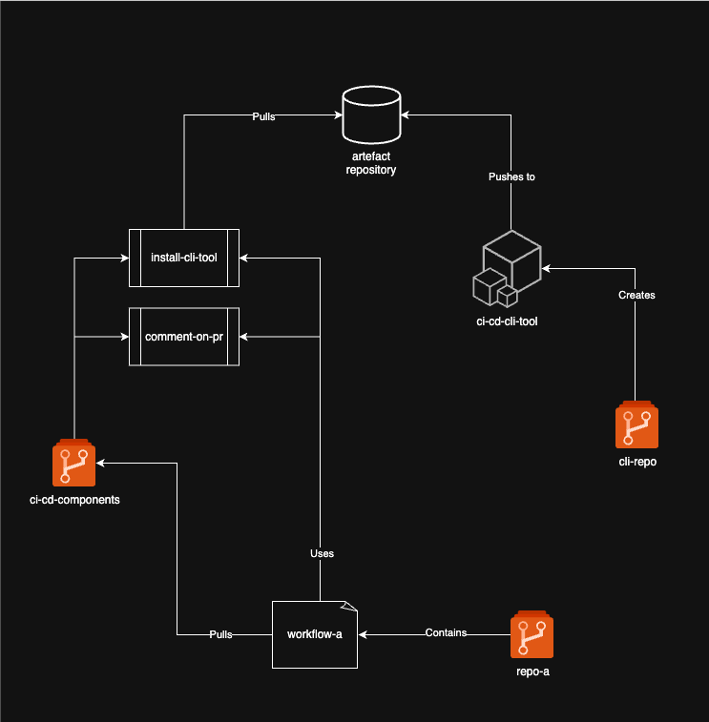
The solution is a centralised library of reusable CI/CD components. The architectural question is how that library is distributed to the repositories that consume it: pull or push.
Pull model
In a pull model, you maintain a semantically versioned library of reusable tasks. Repositories reference the library at a specific version and call the tasks they need. They pull what they want; the library doesn’t push anything to them.
The workflow I use for building out components is Kent Beck’s “make it work, make it right, make it fast”:
- Make it work — implement the task directly in the source repository. Unblock the developer immediately.
- Make it right — once it’s working, generalise it into the library with proper standards applied: security scanning, toolchain standardisation, documented interface.
- Make it fast — after a few weeks of real usage, evaluate performance and optimise.
A concrete example from this engagement: a developer needed a Docker build in their pipeline. I first got a basic build working in their repository — built the image, pushed it to the internal artefact registry, unblocked the work. Then I generalised it into the library, added build caching, embedded Trivy security scanning, and defined a proper interface. A few weeks later I identified the CLI tooling being used for builds was inefficient, replaced it with buildah, and cut build times by 95%. Repositories using the component just bumped to the new patch version. No other work required on their part.
An improvement to a centralised component benefits every downstream repository simultaneously.
In GitHub Actions, the pattern uses composite actions:
- uses: <org>/<library-repo>/<action-path>@<version>
  with:
    key: value
Here’s a real example from sudoblark/sudoblark.github-actions.library, calling the terraform/plan composite action from a deployment workflow:
- uses: sudoblark/sudoblark.github-actions.library/terraform/plan@1.0.0
  with:
    terraform_version: $TERRAFORM_VERSION
    working_directory: $GITHUB_WORKSPACE/infrastructure/sudoblark
    artefact_prefix: sudoblark
    aws_region: eu-west-2
    aws_access_key: $AWS_ACCESS_KEY_ID
    aws_secret_access_key: $AWS_SECRET_ACCESS_KEY
The component definition (terraform/plan/action.yml) does considerably more than a naive plan step. It runs validation, format checks, the full plan, and Checkov security scanning — all inside the Hashicorp Docker container for environment consistency — then packages everything into a single artefact:
name: "sudoblark.github-actions.library/terraform/plan"
description: >-
  Run quality checks against terraform, in addition to outputting a plan, with results outputted
  to a pipeline artefact ZIP file with the name {{ inputs.prefix }}-terraform-artefact, contents
  of which are as follows:

  - terraform.plan        : Binary terraform plan
  - terraform.validate    : Results of terraform validation
  - terraform.show        : Terraform plan in human-readable format
  - terraform.json        : Terraform plan in JSON format, required for some downstream CLI tooling
  - terraform.format      : List of files which have failed terraform format checks, else an empty file
  - checkov.xml           : JUnit output of Checkov results, can be used to upload test results downstream
inputs:
  terraform_version:
    description: "Semantic version of Terraform to utilise for the task."
    required: true
  working_directory:
    description: "The working directory to utilise when performing the task."
    required: true
  artefact_prefix:
    description: "Prefix to append to terraform-artefact produced by the task."
    required: true
  aws_region:
    description: "AWS_DEFAULT_REGION value, required if the hashicorp/aws provider is utilised."
    default: ""
    required: false
  aws_access_key:
    description: "AWS_ACCESS_KEY_ID value, required if the hashicorp/aws provider is utilised."
    default: ""
    required: false
  aws_secret_access_key:
    description: "AWS_SECRET_ACCESS_KEY value, required if the hashicorp/aws provider is utilised."
    default: ""
    required: false
Having a known output shape from every component means you can build further tooling on top: feed Checkov results into a centralised compliance dashboard, chain plan and apply steps without brittle path assumptions, or roll out new scanning tools (Regula, tfsec, Terrascan) across the entire estate in a single component update.
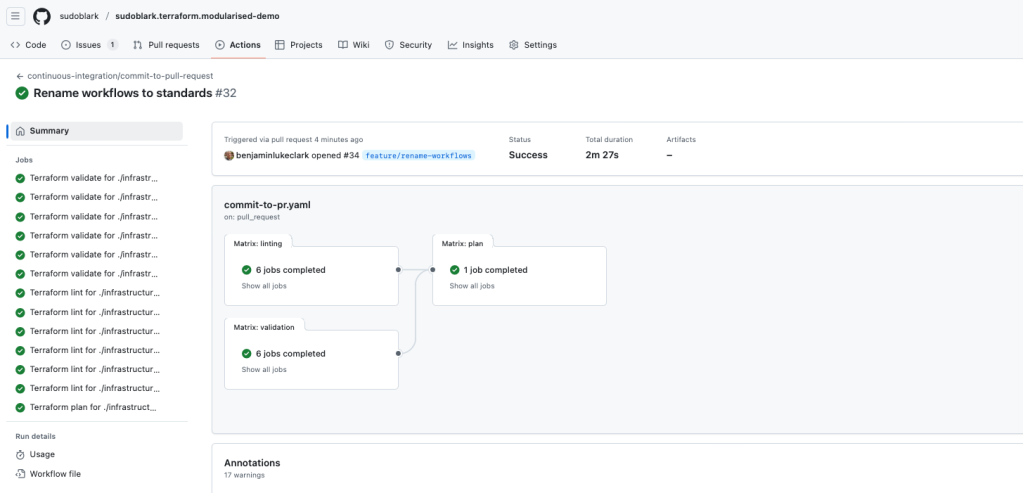
The full deployment workflow from sudoblark/sudoblark.terraform.modularised-demo shows the complete pattern — plan, gate on human approval, apply — with the complexity absorbed by the library:
---
name: deployment/sudoblark/deploy
env:
  AWS_ACCESS_KEY_ID: ${{ secrets.SUDOBLARK_AWS_ACCESS_KEY_ID }}
  AWS_SECRET_ACCESS_KEY: ${{ secrets.SUDOBLARK_AWS_ACCESS_KEY_VALUE }}
  AWS_DEFAULT_REGION: eu-west-2
  REPO_GITHUB_TOKEN: ${{ secrets.GITHUB_TOKEN }}
  ORG_GITHUB_TOKEN: ${{ secrets.SUDOBLARK_GITHUB_TOKEN }}

on:
  workflow_dispatch:
    inputs:
      apply:
        description: "If we should apply the terraform"
        type: boolean
        default: false

permissions:
  issues: write

jobs:
  plan:
    name: Run Terraform plan
    runs-on: ubuntu-20.04
    steps:
      - uses: actions/checkout@v3
        env:
          GITHUB_TOKEN: ${{ env.REPO_GITHUB_TOKEN }}

      - name: Auto-discover Terraform version
        run: |
          TERRAFORM_VERSION=$(cat infrastructure/sudoblark/.terraform-version)
          echo "TERRAFORM_VERSION=$TERRAFORM_VERSION" >> $GITHUB_ENV

      - uses: sudoblark/sudoblark.github-actions.library/terraform/plan@1.0.0
        with:
          terraform_version: $TERRAFORM_VERSION
          working_directory: $GITHUB_WORKSPACE/infrastructure/sudoblark
          artefact_prefix: sudoblark
          aws_region: eu-west-2
          aws_access_key: $AWS_ACCESS_KEY_ID
          aws_secret_access_key: $AWS_SECRET_ACCESS_KEY

  approval:
    name: Wait for approval
    runs-on: ubuntu-20.04
    needs: plan
    if: ${{ success() && inputs.apply }}
    steps:
    - uses: trstringer/manual-approval@v1
      with:
        secret: ${{ env.REPO_GITHUB_TOKEN }}
        approvers: benjaminlukeclark
        minimum-approvals: 1
        issue-title: "Deploying sudoblark.terraform.modularised-demo to sudoblark"
        issue-body: "Please approve or deny the deployment."
        exclude-workflow-initiator-as-approver: false

  apply:
    name: Terraform apply
    runs-on: ubuntu-20.04
    needs: approval
    steps:
    - uses: actions/checkout@v3
      env:
        GITHUB_TOKEN: ${{ env.REPO_GITHUB_TOKEN }}

    - name: Auto-discover Terraform version
      run: |
        TERRAFORM_VERSION=$(cat infrastructure/sudoblark/.terraform-version)
        echo "TERRAFORM_VERSION=$TERRAFORM_VERSION" >> $GITHUB_ENV
      shell: bash

    - uses: sudoblark/sudoblark.github-actions.library/terraform/apply@1.0.0
      with:
        terraform_version: $TERRAFORM_VERSION
        working_directory: $GITHUB_WORKSPACE/infrastructure/sudoblark
        artefact: sudoblark-terraform-artefact
        aws_region: eu-west-2
        aws_access_key: $AWS_ACCESS_KEY_ID
        aws_secret_access_key: $AWS_SECRET_ACCESS_KEY
Templating entire workflows
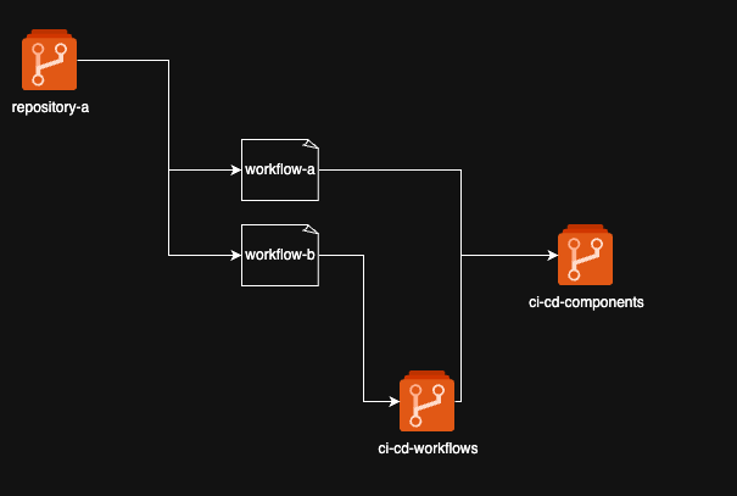
The pull model extends beyond individual tasks. End-to-end workflows can also be centralised, semantically versioned, and reused — they just live in a separate repository to the component library.
A practical example: on an ETL project, developers occasionally needed an anonymised snapshot of production data copied into the test environment. The full process involved discovering KMS keys on source and destination S3 buckets, mutating policies to allow a cross-account copy, running an AWS CLI sync, and restoring the original policies. Once built for one ETL project, it was going to be needed again elsewhere. I generalised it into a reusable workflow, versioned it, and made it available across the organisation.
Reusable tasks and reusable workflows are complementary. A reusable workflow is often just a collection of reusable tasks, composed and parameterised for a specific end-to-end use case.
In Azure DevOps Pipelines, the pull model uses repository resources:
resources:
  repositories:
    - repository: library
      endpoint: "<source platform>"
      name: <repo>
      type: <source platform>
      ref: "refs/tags/x.y.z"
Then referenced per task:
- template: <task>.yaml@library
  parameters:
    key: value
Push model
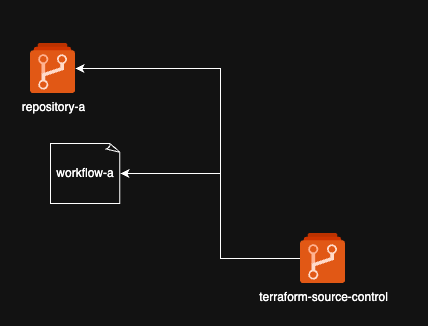
In a push model, you flip the assumptions. Rather than providing a library for repositories to consume, you centralise management of all pipelines across the organisation. A source control management platform — typically something like Terraform-managed GitHub organisation configuration — bootstraps repositories with standardised workflows, which can then read in repository-specific configuration at runtime using dynamic matrices:
jobs:
  generate_matrix:
    name: Generate matrix of accounts to plan
    runs-on: ubuntu-20.04
    outputs:
      job_matrix: ${{ steps.matrixStep.outputs.matrixOutput }}
    steps:
      - uses: actions/checkout@v3
        env:
          GITHUB_TOKEN: ${{ env.REPO_GITHUB_TOKEN }}

      - name: Read in dynamic matrix
        id: matrixStep
        run: |
          TARGETS=$(cat .github/planArgs.json)
          echo "matrixOutput=$(jq -cn --argjson environments "$TARGETS" '{target: $environments}')" >> $GITHUB_OUTPUT

  plan:
    name: Run Terraform plan
    runs-on: ubuntu-20.04
    needs: generate_matrix
    strategy:
      matrix: ${{ fromJson(needs.generate_matrix.outputs.job_matrix) }}
    steps:
      - uses: actions/checkout@v3
        env:
          GITHUB_TOKEN: ${{ env.REPO_GITHUB_TOKEN }}

      - uses: sudoblark/sudoblark.github-actions.library/terraform/plan@1.0.0
        with:
          terraform_version: 1.6.1
          working_directory: $GITHUB_WORKSPACE/infrastructure/${{matrix.target}}
          artefact_prefix: ${{matrix.target}}
          aws_region: eu-west-2
          aws_access_key: $AWS_ACCESS_KEY_ID
          aws_secret_access_key: $AWS_SECRET_ACCESS_KEY
With .github/planArgs.json:
{
    "target": ["accountA", "accountB", "accountC"]
}
The workflow is centrally defined but adapts to each repository’s specific environments or targets.
In my experience, the push model is less common. It requires a mature source control management practice — you need to be managing your GitHub organisation declaratively before centralised workflow distribution is practical. The two models aren’t mutually exclusive, either; centrally-pushed workflows can still consume components from a pull library.
Adoption is the real problem
Building the library is the easy part. Getting engineers to use it — rather than copy-pasting something that already works — is considerably harder.
The resistance comes in three forms, and they all showed up simultaneously on this engagement.
The simplest objection is that it already works. When you tell an engineer their bespoke pipeline needs to be replaced with a centralised component, their immediate response is that their pipeline already works, and on its own terms that’s fair. The argument isn’t about whether it works — it’s about what happens when you need to change it at scale, or enforce a security standard across a hundred repositories, or improve build performance without touching every pipeline individually. That argument is abstract until you demonstrate it concretely.
The second objection has more merit — early on, the library didn’t fit every team’s needs because it was underdeveloped. The pattern I used to address this was deliberate: an embedded DevOps engineer would work directly with a team to implement whatever CI/CD they needed, solving the problem locally inside their repository. When that implementation became stable, I would take the working code, abstract it into the component library with a proper interface, and backport it back into the original repository. The library grew to fit the business’s needs as they arose, rather than trying to anticipate them upfront. By the time a second team came along with the same requirement, the component already existed.
The third form is inertia. When people have deadlines and a process that works, changing it looks like change for its own sake. The tipping point was time. Once the library had enough components, the comparison became stark: if project A was already using a component for Docker builds, setting up the same capability for project B took an hour rather than a multi-day exercise in figuring out what worked the first time around.
People moved when they saw a concrete result, not when they were told to. The Docker build improvement is the clearest example: I published the initial component, then over several weeks swapped out the underlying tooling, added caching, changed almost everything about how the build happened. The interface the pipeline called stayed identical. Engineers got a 95% reduction in build times without touching their pipelines at all. Nobody cared how the improvement happened; they just got faster builds.
The same principles that justify interfaces and abstractions in software engineering apply here. Design a component with a stable interface and you can gut the implementation entirely without affecting any consumer. I got to focus on improving the platform; they got to focus on their work.
Filling platform gaps
Regardless of whether you’re using a pull or push model, every CI/CD platform has gaps that no off-the-shelf component will plug. Bespoke integrations with internal APIs, cross-platform tooling, organisation-specific processes — these all need to be handled somehow.
The usual answer is bash. One of my clients had eight thousand lines of bash constituting the core logic of their CI/CD platform. It worked, in the sense that it ran. But it was untested, unextensible, and practically impossible to read. Every change was a risk. Every new requirement was a battle.
The alternative is an internal CLI tool.
Wherever bash would normally accumulate, replace it with a proper CLI tool that is tested, documented, and platform-independent. Tasks in the component library then wrap around the CLI tool to provide a friendly interface — developers use the reusable components, and the components use the CLI tool under the hood. Developers have no visibility into the CLI tool’s existence. They get reliable, well-behaved pipeline steps.
My preference is Python, and specifically Typer for building the CLI layer. It generates argument parsing, help text, and type validation from Python type hints, which means the interface is self-documenting with very little overhead. The principle is language-agnostic — what matters is that the tool is tested, has a clear interface, and can be versioned independently of the CI/CD components that consume it.
Making it discoverable
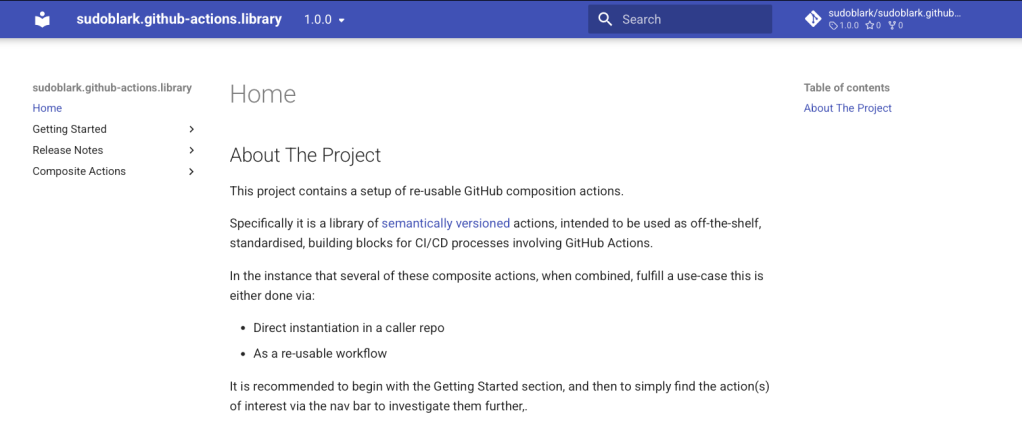
Having a centralised component library is only useful if engineers can find out what’s in it. What versions exist? What tasks are available? What changed between versions? If the answers to these questions require asking someone or digging through YAML files, the library will go unused.
The combination of mkdocs and mike handles this well. mkdocs builds versioned documentation from Markdown files; mike manages deploying multiple versions to GitHub Pages with a version selector.
The sudoblark.github-actions.library repository contains a working end-to-end setup. The mkdocs.yml configuration is intentionally minimal — it maps friendly names to documentation files, enables search, and configures versioning:
site_name: sudoblark.github-actions.library
repo_url: https://github.com/sudoblark/sudoblark.github-actions.library
site_url: https://sudoblark.github.io/sudoblark.github-actions.library/
site_author: Benjamin Clark
docs_dir: docs
theme:
  name: material

extra:
  version:
    provider: mike

nav:
  - "Home": 'index.md'
  - "Getting Started":
      - "What are composite actions": "getting-started/what-are-composite-actions.md"
      - "How to utilise": "getting-started/how-to-utilise.md"
  - "Release Notes":
      - "1.0.0": "release-notes/1.0.0.md"
  - "Composite Actions":
      - "Terraform":
          - "plan": "composite-actions/terraform/plan.md"
          - "apply": "composite-actions/terraform/apply.md"

plugins:
  - search
Documentation is published automatically on release via a CD workflow (.github/workflows/release.yaml):
name: Release artefacts to the wild

on:
  release:
    types: [published]

permissions:
  contents: write

jobs:
  publish_docs_to_gh_pages:
    runs-on: ubuntu-latest
    steps:
      - uses: actions/checkout@v4
        with:
          fetch-depth: 0
          fetch-tags: true
        env:
          GITHUB_TOKEN: ${{ secrets.GITHUB_TOKEN }}

      - uses: actions/setup-python@v1
        with:
          python-version: 3.10.16

      - name: Setup venv
        run: python3 -m venv venv

      - name: Grab release tag
        run: |
          export RELEASE_TAG_VERSION=${{ github.event.release.tag_name }}
          echo "RELEASE_TAG_VERSION=${RELEASE_TAG_VERSION:1}" >> $GITHUB_ENV

      - name: Install mkdocs
        run: |
          source venv/bin/activate
          pip install -r mkdocs-requirements.txt

      - name: Build and push
        run: |
          source venv/bin/activate
          git config user.name sudoblark-bot
          git config user.email enquires@sudoblark.com
          mike deploy ${RELEASE_TAG_VERSION} --push
          mike delete latest --push
          mike alias ${RELEASE_TAG_VERSION} latest --push
          mike set-default latest --push
        env:
          GITHUB_TOKEN: ${{ secrets.SUDOBLARK_GITHUB_TOKEN }}
The key step is the mike alias that keeps a latest pointer current. Users navigate to /latest and from there select any specific version they need. The documentation lives alongside the code, releases are published automatically, and version history is preserved.
Conclusion
If you’re looking at a growing CI/CD estate and wondering where to start, start with naming.
Not the library, not the CLI tool, not the documentation — naming. It costs almost nothing to implement, it’s immediately reversible if you pick the wrong convention, and it forces a conversation about what your pipelines are. Often that conversation is the first time anyone has examined how the CI/CD estate is structured.
Take your pipeline list and ask whether you can tell — from the name alone — what each pipeline deploys to, and to which environment. If you can’t, fix that first. It won’t solve the adoption problem, the governance problem, or the tooling problem. But it will make every subsequent improvement easier, because you’ll finally be able to see what you’re working with.
The rest of the architecture described here — the library, the CLI tooling, the documentation — comes after that. Build it iteratively, let real team needs drive what gets centralised, and demonstrate value concretely rather than arguing for it abstractly. Engineers who can’t see a reason to change won’t change. Engineers who just got a 95% build time reduction from bumping a version number will.
Further Reading:
- sudoblark/sudoblark.github-actions.library — the component library referenced throughout this post, with full mkdocs documentation
- sudoblark/sudoblark.terraform.modularised-demo — a working example of the pull model in practice
- Big Ball of Mud — Foote & Yoder’s original paper, worth reading for the CI/CD pattern recognition alone
- mkdocs and mike — the documentation stack used in the examples above
Part 2 of 3 in Sudoblark Best Practices